
Half-Life
Custom Maps
Art
Museum
Temple
Revenant
Meatpit
Storm
Vale
GE
Basement
GE Temple
Hypersanctum
Battleschool
by
Hayt & Jinx
Noir
by
DQ
Sealed
by
3DMike
____________
Half-Life
2
Custom Maps
Upscale
1%
done
Ramparts
20%
done
Advanced R_speed Tweaks
Although VIS blockers are the most important way to keep your r_speeds under control, there are a variety of other tweaks and tricks you can do to lower your r_speeds within each area of your map. An area can have significantly different r_speeds depending on how you tweak it. Below are several techniques you can use to lower your r_speeds.
Scaling Up Textures:
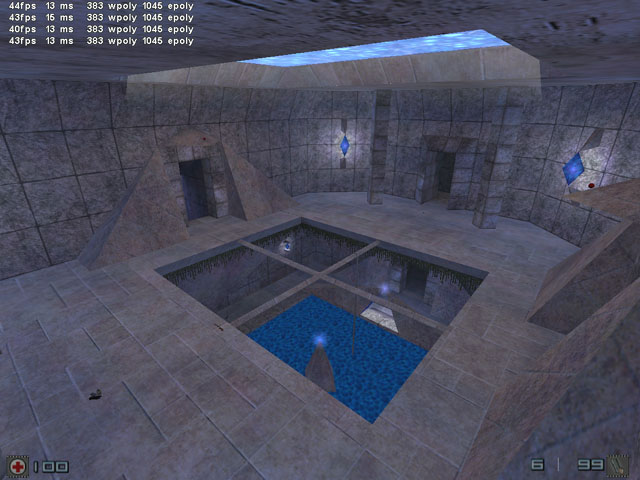
This trick is very important in large, open areas. Each face of a brush is cut up into sections to be rendered; in general, the higher the scale of the texture on the brush face, the less parts it will be broken into and the less "polies" it will add to your r_speeds. So if you have a huge wall, scaling it up to 1.5 or 2.0 can noticably lower your r_speeds. The same goes for the ground, etc. This is mostly important on large brush faces such as these. Scaling up to 2.0 is pretty typical in open areas. It gives a noticable drop in r_speeds but doesn't usually make the texture too blurry. Just make sure you use textures that look decent scaled up, and not out of proportion to the player or the scale of the map itself. Below is a room from Temple with most textures scaled to 2.0:
Using gl_wireframe To Help Tweak:
The gl_wireframe command allows you to actually see how faces are being broken up into polies, and even how much of the map is being drawn. Gl_wireframe 1 does the former, placing glowing lines on each face that the engine is drawing which show how it is being split up. Gl_wireframe 2 does the same thing, but the lines it creates can be seen through walls, thus allowing you to tell how much of the map is being drawn (including other areas that maybe should not be drawn!).Gl_wireframe 1, then, is good for seeing how faces are being split etc. as you will see in the next section. Gl_wireframe 2 is best for seeing if your VIS blockers are actually working and stopping other areas from being drawn. These two commands are very useful because in a sense they let you "see" your "polies". If an area has high speeds, using these will often let you see what the problem is. They can also help you see that your tweaks, VIS blockers, etc. are working.
Avoiding Face-Splitting:
When one brush touches another brush, the bigger brush face is broken around the contact point. In other words, the face is split into more sections and thus more polies. This can significantly raise your r_speeds. Imagine, for example, a room with a table and chairs. The floor, which would otherwise be only a few polies, gets split and fragmented by the legs of the furniture touching it! Fortunately, there are a couple ways to avoid such problems.One way is by using what mappers refer to as "One-Pixel Spacing". In the above example, we could just raise all the furniture one pixel above the floor so that it would not be touching. This would prevent the face splitting on the floor, and would be pretty much unnoticable to players.
Another way to avoid face-splitting is by turning some brushes into func_walls. Entities do not block VIS, but they do not split faces either since VIS sees through them. So, were you to turn each furniture prefab into a func_wall, that would also prevent the face-splitting from occuring.
Which technique is best? The real answer is "both". The advantage of one-pixel spacing is that it does not involve making an entity, and thus keeps your map "simpler" overall. The disadvantage is that in some cases the 'gap' may be noticable. Func_walls are good for those cases, and in some cases where one-pixel spacing just doesn't make sense. The disadvantage of func_walls is that they use up an entity. Also, func_walls do not normally block light because they are entities (unless you set the opaque lightflag). This can be good or bad depending on the lighting situtation.
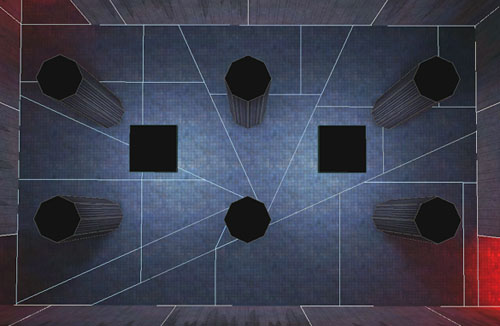
In the gl_wireframe 1 pic below the lower center pillar is touching the floor and breaking it into more faces- but the other pillars, spaced 1 pixel above the floor, are not. Now- imagine if they were all touching the floor! This is why avoiding face-splitting is so important.
Remember that these are techniques to use within areas that are otherwise VISed off. If you turn a VIS blocking wall into a func_wall or space it, it will not block VIS and your speeds will actually get higher! And if you use either of these on an outer wall, you will get a Leak! Mostly you will use these for furniture, internal architecture, pillars, etc.
Using the NULL Texture:
The Null texture is a feature recently added to the Zoner's compile tools, and can be extremely useful. Basically, any face you place the texture named NULL on will not be rendered and will not add to r_speeds. This can be extremely useful on some maps where there are places (the tops of a roof, for example) that cannot be seen from the player's perspective. Using the Null texture, you can often remove a lot of faces that cannot actually be seen by the player, but are rendered anyway. Note that people used to use the SKY texture for this purpose, but the Null texture is preferable since this is what it is meant for. Just make sure that the faces you apply it to cannot be seen, or the player will see a blurry effect where a texture should be!
Below is a pic of the area above the play area in my map Meatpit- noone can get up here or see up here, so I have applied the Null texture to most surfaces:
Other places you can use the Null texture:
-the bottom/top of a brush that has been one-pixel spaced.
-use the Null texture instead of the {invisible texture
Max Node Size:
Using the "-maxnodesize" parameter in hlbsp can significantly lower r_speeds on some maps. I am not sure precisely how it works, but it seems to effect how your map is broken up and thus how it is VISed.
The default setting, ie what it is if you specify nothing, is 1024. I find that for maps with large, open area 4096 often works best (Temple). For maps with smaller areas, where you want less 'bleedover' between areas, -512 seems to work best (Stormvale). It is best to experiment with different values, though, to see which works best. This setting will effect different parts of the map differently, so see which is best overall, and/or lowers speeds where help is most needed.
[thanks to Banana for teaching me this one]
Hint Brushes:
These are not something I have ever had need to use myself. As I understand it, Hint brushes help guide VIS in determining what should be rendered. By "manually" guiding VIS in this way, you can sometimes lower your r_speeds and make VISing more accurate. Note that this is an advanced technique, and one that is generally only needed in certain specialized circumstances. Also, I have been told that Hint brushes do not work well with the Max Node Size tweak, so you should probably choose one or the other. If you are an advanced mapper, and think this is a technique that might help you, there is a thorough tutorial available here at Counter-Map.
Translucated Textures:
This is a rarely known/used trick. If you cover a normal brush with a texture that begins with the "@" symbol, that brush will be totally passable like a func_illusionary, but will still block VIS. Obviously this is useful in only a few special situations. The main way of using this that I have seen is with curtains because they are passable but players don't expect to be able to see through them. I am trying them for this in the windows in Noir. As you can see in this gl_wireframe 2 pic, while Vis sees through the normal doors, it is not seeing through the windows' curtains:
There is nothing special about a "@" texture other than the @ prefix (just like a ! water texture), so just take the texture you want to use, make a new version with @ at the beginning of the filename, and add that back into your wad.
There is one bug with this technique- while a player is 'inside' the special brush it can create a visual bug because they are basically clipping through a wall. So make the curtain etc. as thin as possible to minimize this.
[thanks to X-Tender for telling me about this one]
p.s.: No I don't know what "translucated" means, it's just what XT called them, :)

Resources
for
mappers
Tutorials
Textures,
Sounds,
& Sprites
Resource
Links
Misc
Files
Map
Ideas
MIA AHL Maps
Proto-Maps
Contact
Info